

Designing your yard can feel overwhelming. Before you worry about exact measurements, materials, or plant choices, the very first step is creating a landscape bubble drawing or bubble diagram. This simple sketching technique helps you transform your wishlist into a functional layout that makes sense for your space.
What Is a Landscape Bubble Drawing?

A bubble drawing (also called a bubble diagram or functional diagram) is a loose sketch that maps out the different areas of your yard. Each “bubble” represents a functional space—patio, play area, lawn, vegetable garden, shed, etc.
It’s not about precision. It’s about relationships—what goes where, how big it might be and how the zones connect.
Why Start With Bubble Diagrams?
- Brainstorm freely: Explore ideas quickly without overthinking details.
- See the big picture: Identify circulation paths and functional zones.
- Test multiple layouts: Try 2–3 quick variations before refining.
- Save time later: Laying out zones first makes the next step (lines of force) much smoother.
How to Create a Landscape Bubble Drawing, Step-By-Step

Step 1. Gather Your Base Map
Print or sketch your property outline to scale. This could be from a property boundary surveyGoogle Earth, or a hand-drawn map.
For more help with this step, check out my article: Design a Garden Layout: A Step by Step Guide to Planning Your Dream Landscape
Step 2. Define Circulation Paths
Draw arrows to show where people walk—front door to backyard, driveway to shed, kitchen to patio, etc.
Step 3. Make Your Wishlist
List the elements you want: patio, lawn, play area, vegetable garden, shed, storage, beds, etc.
If you want help creating your garden wishlist, check out my Garden Style Mood Board Workshop.
Step 4. Place Your Bubbles
Use circles, ovals, or rectangles to block in each functional area. Keep it loose and simple. Don’t worry about exact sizes yet.

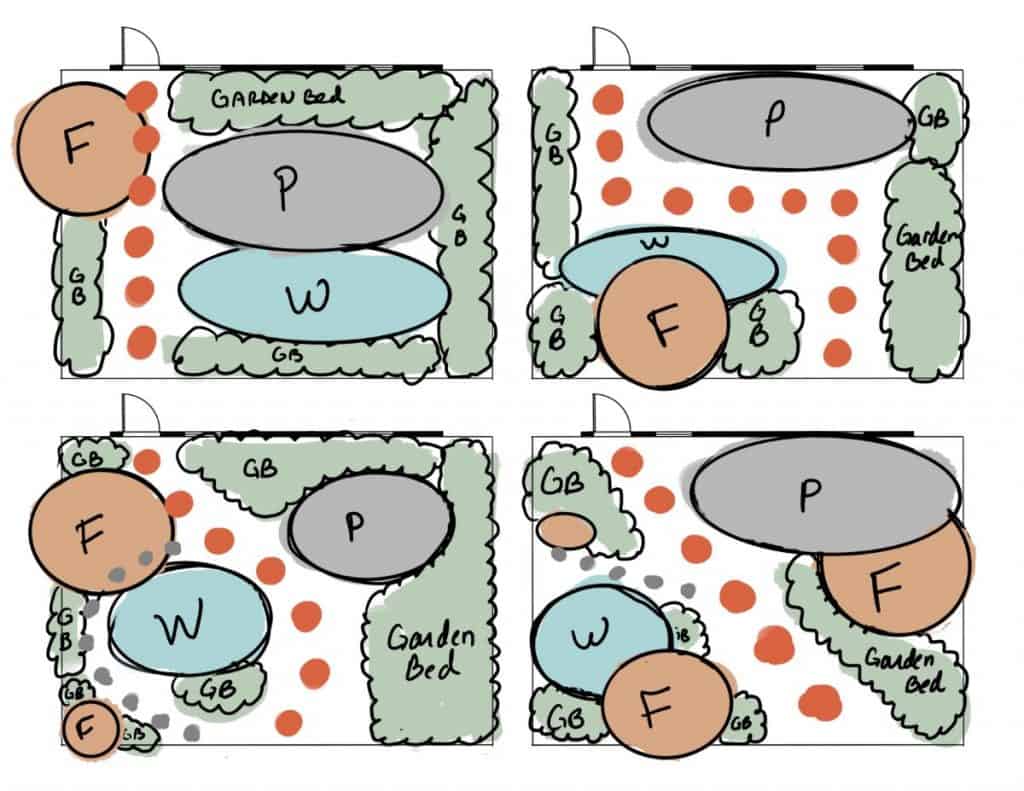
Step 5. Explore Multiple Versions
Draw at least 2–3 variations. Shift the patio to another spot, try different lawn shapes, move the play area—see what flows best.
Tips for Better Bubble Drawings
- Keep about two-thirds of the space for open functional areas (patios, lawns, walkways) and one-third for planting.
- Don’t aim for perfection—speed is key.
- Think of them as idea sketchesnot final plans.
- Use tracing paper (or digital layers) to iterate quickly.
Example Walkthrough
In this video, I walk you through how I create bubble drawings and then use the design tool of lines of force to create a completed landscape design.
Subscribe to my YouTube channel for more gardening videos!
What Comes Next: From Bubble Drawing to Structure
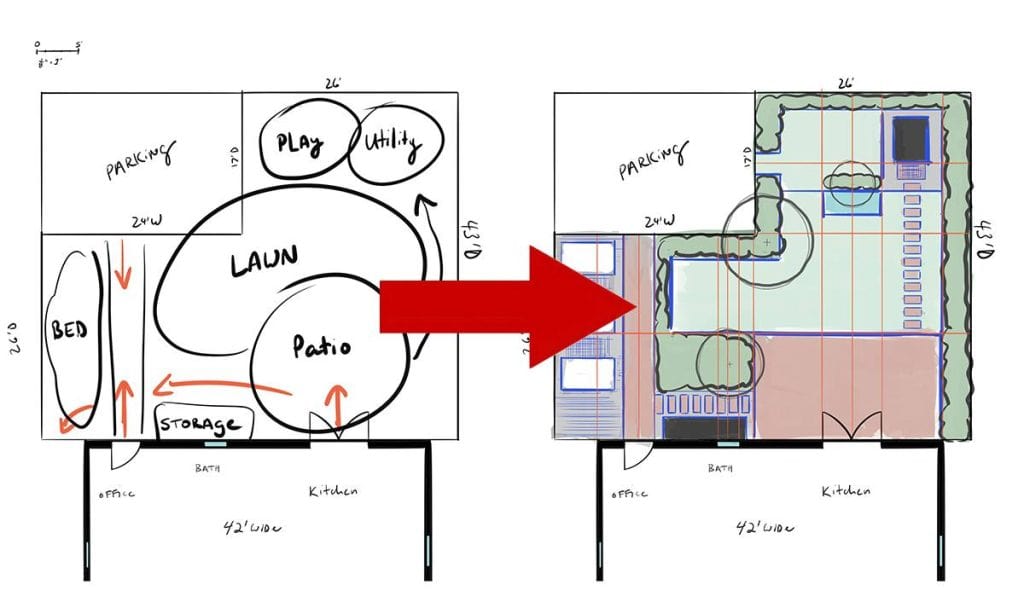
Once you’ve settled on a bubble drawing that feels right, the next step is refining it with lines of force.

In landscape design, lines of force, are imaginary “regulating lines” that extend from your home’s doors, windows and corners to create a grid. This grid helps you align patios, beds and walkways so they connect seamlessly with your house.
👉 Read the next article: How to Use Lines of Force in Landscape Design
Wrapping Up
A landscape bubble drawing is the essential first step in turning ideas into a layout that works. It’s quick, flexible and fun—and it lays the groundwork for more advanced tools like lines of force in landscape design.
If you want to take this process further, my Plant Perfect Activity Book walks you through bubble drawings, lines of force and creating a cohesive layout for your yard.